The Art of Creating a Beautiful Origami Paper Christmas Tree
The Art of Creating a Beautiful Origami Paper Christmas Tree
Introduction
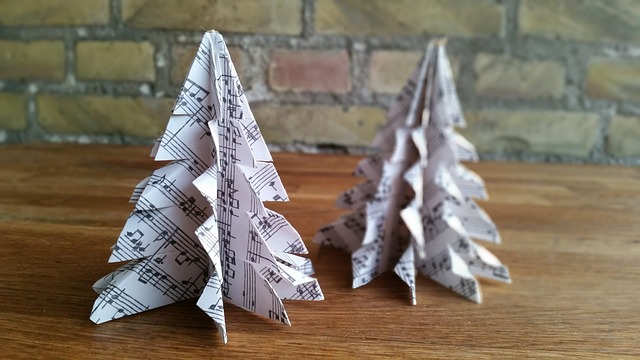
The holiday season is a magical time filled with joy, warmth, and love. One of the most beloved traditions during this time of year is decorating the Christmas tree. While many opt for store-bought decorations, there is something special about creating your own unique ornaments. In this article, we will explore the art of creating a beautiful origami paper Christmas tree. Whether you are a beginner or an experienced origami enthusiast, this step-by-step guide will help you bring a touch of elegance and creativity to your holiday decorations.
Materials Needed
Before we dive into the instructions, let’s gather the necessary materials:
1. Origami paper in festive colors such as green, red, or gold.
2. Scissors (optional, depending on the design you choose).
3. Decorative accents such as glitter, ribbons, or sequins.
4. Patience and a sense of creativity!
Step 1: Choosing the Design
First, decide on the design you want for your origami paper Christmas tree. There are various options to choose from, ranging from simple to intricate. Some popular designs include a three-dimensional tree, a flat tree that can be hung on a wall, or even a mini origami tree that can be used as a table centerpiece. Consider your skill level and the amount of time you have available before making your choice.
Step 2: Folding the Tree
Now that you have chosen a design, it’s time to start folding! Follow these steps:
1. Take a square sheet of origami paper and fold it in half diagonally, forming a triangle.
2. Fold the triangle in half again so that the pointy end meets the opposite side.
3. Fold the two bottom corners of the triangle up, creating a smaller triangle.
4. Fold the right and left corners of the smaller triangle towards the center, creating a diamond shape.
5. Fold the bottom flap of the diamond up, allowing it to overlap the two sides of the diamond.
6. Turn the paper over and fold the bottom half up, forming the bottom of the tree trunk.
7. Once you have completed these steps, your origami paper should resemble a Christmas tree shape.
Step 3: Adding Decorative Accents
This is where your creativity comes into play! You can embellish your origami paper Christmas tree with decorative accents to make it even more festive. Consider adding glitter, sequins, or ribbons to represent ornaments on the tree. You can also use a pair of scissors to carefully cut out small designs such as stars or snowflakes in the origami paper. Let your imagination run wild!
Step 4: Displaying Your Origami Christmas Tree
Finally, find the perfect spot to display your beautiful creation. Your origami paper Christmas tree can be placed on a table, hung on a wall, or even used as a unique gift tag. Share your masterpiece with family and friends, and let them admire your talent and creativity.
Conclusion
Creating an origami paper Christmas tree is a delightful way to add a personal touch to your holiday decor. The process of folding and designing your own tree allows you to express your creativity and brings a sense of accomplishment. So, gather your materials, follow the instructions, and enjoy the process of creating a beautiful origami paper Christmas tree that will be cherished for years to come. Happy folding and happy holidays!
FAQ
Jak zacząć tworzyć piękne origami choinki z papieru?
Rozpocznij od przygotowania kwadratowego kawałka papieru w wymiarach 15×15 cm. Pamiętaj, aby dobrze go wyprasować, aby proste składanie było łatwiejsze.
Jak złożyć podstawę choinki?
Aby złożyć podstawę choinki, zacznij od składania kwadratowego kawałka papieru na pół po przekątnej. Następnie rozłóż go i złożyj na pół w drugą przekątną. Otrzymasz składaną podstawę w kształcie trójkąta.
Jak złożyć kolejne warstwy choinki?
Aby złożyć kolejne warstwy choinki, zaczynając od podstawy, złożoną w poprzednim kroku, zacieśniaj skręty dzielące trójkątny element od góry do dołu. Stopniowo zwracaj składane elementy ku górze, tworząc hierarchiczne warstwy.
Jak ozdobić choinkę?
Po złożeniu choinki, możesz dodatkowo ją ozdobić. Możesz dodać kolorowe detale, takie jak gwiazdka na szczycie, łańcuchy z papierowych pasków lub małe ozdoby.
Jak wykonać harmonijkowe składanie?
Aby wykonać harmonijkowe składanie, zacznij od złożenia papieru na pół wzdłuż jednej krawędzi, a następnie rozłóż go. Następnie złożony papier zepnij w równe odległości i zacieśnij je. Powtarzaj ten proces, tworząc harmonijkowe składane elementy.
Jakie są różne techniki składania papieru?
Istnieje wiele różnych technik składania papieru, takich jak podwójne składanie, harmonijkowe składanie, składanie po przekątnej. Każda technika daje inne efekty i tworzy różne wzory.
Jaki rodzaj papieru najlepiej używać do origami?
Najlepiej używać specjalnego papieru do origami, który jest lekki, ale jednocześnie odporny na składanie. Możesz również użyć kolorowego papieru, aby dodać efekt wizualny do swojej choinki.
Czy origami to trudna sztuka?
Origami może być początkowo trudne, ale z praktyką i cierpliwością można nauczyć się tworzyć piękne dzieła. Warto zacząć od prostszych projektów, a następnie stopniowo rozwijać umiejętności.
Czy istnieje wiele wzorów origami choinek?
Tak, istnieje wiele różnych wzorów origami choinek. Możesz eksperymentować z różnymi technikami i wzorami, aby stworzyć unikalną choinkę zgodnie z własnym stylem i preferencjami.
Jak można wykorzystać origami choinki?
Origami choinki mogą być używane jako ozdoby na święta Bożego Narodzenia. Można je umieścić na stole, w oknie lub na choince. Mogą również być pięknymi prezentami dla przyjaciół i rodziny.